Sunday, November 27, 2011

Speakers installation in the rear of the house

Wow - what an effort, a Sunday and Monday well spent.

The plan was to install the bathroom, kitchen and patio speakers.

First I drilled down from the roof in to the study and fed up four runs of Monoprice wire from my roll (300ft 12AWG Enhanced Loud Oxygen-Free Copper Speaker Wire Cable - $85). In the picture below you can see the built in robe in the Study and the my internet connection (Bigpond Cable).

Future data cabinet location in the Study.

Next week I am having an electrician install a power point in the built-in robe and I will use the highlighted shelf as my "data cabinet" for my router, Sonos amplifiers and Drobo-FS NAS. Eventually I will have a white conduit covering the cables coming down into the walk in robe.

The wire in the roof I ran from beam to beam by attaching a staple to each beam and then attaching the wires to the beams using a cable tie. This seemed to be the best method recommended by the Polk DIY Speaker installation guide. This guide is very helpful and I would highly recommend it to anyone preparing to install ceiling or wall speakers.

The speakers I was planning to install were not in the main roof, rather in the back of the house, a lean-to which consists of the bathroom, kitchen and the back wall of the house. From the main roof we ran the four speaker wires through a conduit cable (bought in a roll of 10m from Bunnings). Four cables were the limit for the thickness and we used string to pull the wires through one at a time.

As seen below, the roof on the lean-to is very thin and is not accessible from below so we had to remove the roofing sheets.


Removing the sheets was quite easy but replacing them probably the hardest part of the job and required extra hands as it was very difficult to replace them as it was hard to push them back in above the beam under the housing sheet (which eventually had to come out) as well as cutting a hole in the sheet for the conduit. Replacing the sheets turned the one day job into a two day affair.

For the kitchen and bathroom speakers I chose to use Polk Audio RC60i In-Ceiling / In-Wall Speakers (Pair, White) based on positive reviews on the Sonos forums and a friend whom had previously had Polk equipment which sounded fantastic.

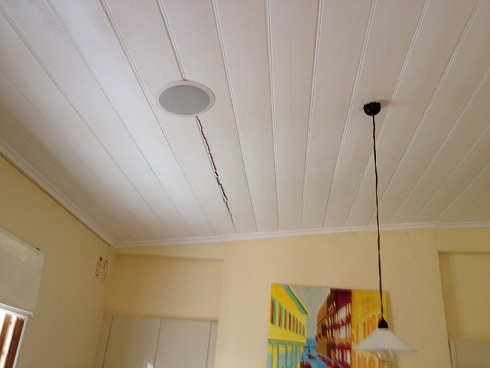
The kitchen speaker was quite easy to install from above. Roughly where I wanted the speaker I traced the outline from the template sheet and then drilled a hole in one side and cut out the hole from the ceiling with a jig saw. I then had the speaker pushed up from underneath while they were screwed in from below. 

Ceiling speaker from above

Ceiling speaker in the ceiling.

The crack occurred later when I accidentally mistepped replacing the roofing sheets. A repair job for another day. 

The bathroom speaker was a bit harder as it was under a fake ceiling. The original ceiling made of small slats, plaster, horse hair and god knows what had to be broken through to get to the top of the fake ceiling. 

We then drilled a hole down from the roof and cut up from the bathroom into the fake ceiling using a small drywall/gyp-rock saw using the template supplied with the speaker.

Hole  into bathroom under the original ceiling.

Speaker installed from below and connected. 
Speaker without the grill attached from in the bathroom.
The sound from the Polk RC60i speakers is very good and I am glad I did not go with the RC80i (8 inch) speakers for these rooms as it would have been overkill. I have a pair of RC80i speakers which I am planning to put in the bedroom in the upcoming weeks and compare the sound then.

At the moment I have them connected as left and right channels to the Sonos Connect:AMP. I am searching for a solution to have them produce mono noise instead of stereo to these rooms.

For the backyard patio speakers I chose a pair of the Definitive Technology AW 6500 Outdoor Speaker (Single, White) based on very positive reviews. I managed to get a good deal for a pair, and they where much larger than I expected when I received them.

Using the backing plate which can be detached from the speakers I marked and drilled two into the rear wall of the house. I then installed two dynabolts (12mm/70mm). The dynabolts were overkill as they can hold up to 280 kilograms each but seemed to be a good thickness to bolt the bracket to the wall.
Right speaker

Left speaker
The sound from AW6500's is amazing. There are overkill for my medium sized backyard and the smaller AW5500s would have most likely sufficed. The front part of the V shape is aimed to where there will be people and the rear side woofer bounced bass of the walls.

Mission complete! And apart from the accidental crack in the ceiling I am very happy with the result. I'll provide another update when the bedroom speakers go in comparing the sound between the 6" inch and 8" inch speakers.


Wednesday, November 23, 2011

Sonos project off to a cracking start....

The crack being the noise when I inserted the power cable into my second Connect:AMP (The AMP previously known as Sonos ZonePlayer 120) without switching the voltage switch from 110 to 230.

Luckily it turned out that I wasn't the first brain child to attempt such a power up. Rather then post my Connect:AMP back to the USA, I decided to void my warranty by replacing the fuse myself.

I ordered a minimum quantity of 10 replacement fuses from RS (http://australia.rs-online.com/web/p/products/3772203/) and then set to work disassembling the Connect:AMP by roughly following the useful Flickr stream by at0mac.

1. Firstly I peeled back the sticker on the back and removed the screws below. There are also two screws between the white and red RCA plugs which I just pulled out through the actual sticker.


2. From underneath, using a small flat head screw driver I peeled back a corner of the rubber feet and then removed the screws in each corner.


This revealed the WiFi antenna on the bottom on a backing plate. 


3. I unscrewed the backing plate and carefully put the wires through the white cable holder so I could folder over the backing plate to reveal the bottom of the board.


3. Lightly reassemble the bottom - we'll need it later and remove the top cover. The top cover apparently just "pulls out", but I had quite a bit of trouble with this and ended up causing a little bit of damage to the top cover trying to leverage out the top with a flathead screw driver. I had much better success by threading a wire (or string would do) through two of the holes in a corner and pulling up with a pair of pliers.


4. This revealed the top backing plate. Remove all of the screw (including the hidden one under the warranty/shock sticker). Remove the plate.


5. I missed a photo here, but at0mac has it in his Flickr steam. At this stage you need to remove the WiFi board shown at the top of the picture.

6. This allows access to the fuse soldered onto the board (the orange-brown circle seen below).


7. This is where you might need help from a friend with soldering experience. Find matching fuse pins on the bottom of the board. Heat solder on the fuse pins and remove the fuse and install the replacement fuse.

8. Reassemble Connect:AMP.

9. Very important - Switch the voltage on the amp to 230V before connecting to power :)

If everything is done correctly, the Sonos white LED will hopefully flash while booting and you can connect with the Sonos Desktop software.

This weekend I hope to get in the roof to run some speaker cables and mount my Definitive Audio AW6500 speakers on the veranda in the the back yard. Then I'll connect them to my newly repaired Connect:AMP :)

Here's all of my equipment to install in the upcoming weeks-


2x Connect:AMP
2x Definitive AW6500 Outdoor speakers
Pair of Polk Audio RC60i ceiling speakers (Bathroom + Kitchen)
Pair of Polk Audio RC80i ceiling speakers (Bedroom)
100M of 12AWG Speakerwire (Monoprice)

Wednesday, November 16, 2011

PAR2 and UNRAR for Drobo-FS

Big thanks to Jesper Noehr (jespern) on the Drobo Space forums for cross-compiling unrar and par2 for the Drobo-FS. These binaries are used for SABnzbd to ensure the integrity and extract downloads.

You can get the binaries here:
https://bitbucket.org/jespern/unrar-drobofs/downloads/unrar.tgz
https://bitbucket.org/jespern/par2-drobofs/downloads/par2.tgz

Great work Jesper!

For those looking to get SABnzbd and other related programs running on the Drobo-FS, no sweat, you just need to get Python from Drobo Ports. Drobo Ports is a great site for getting the latest complied binaries for your Drobo and learning how to cross compile yourself.

I would love it see a guide on setting up a Scratchbox2 environment for compiling Drobo-FS apps.

Saturday, November 12, 2011

How to watch Netflix, Hulu, and BBC IPlayer from Australia

Sign up for the service Unblock US. This service changes your DNS settings and redirects certain domain requests to proxy servers to allow access from overseas IP addresses.

This will allow access to standard free services, such as BBC IPlayer.

If the service you are signing up for requires an American credit card (not all do), you can sign up for a virtual visa or mastercard at Entropay. Entropay charge about 5% to "load" money from your real card to a new virtual card.

If the service requires a post code or address many people just make one up. I use my freight forwarding address from MyUS.com. MyUS.com gives you a real address in Florida, which you can use as a shipping address for items (such as electronics) which stores like Amazon or Ebay auctions won't ship out of America. There is a free version of the service which has more expensive shipping.