Sunday, March 16, 2014

How to check if the Sonos Playbar is playing Dolby Digital?

I have paired a Sonos Playbar with Sonos Connect:AMP running a pair of SpeakerCraft AIM8 Three High Ceiling Speakers which are connected via HDMI to my Intel NUC D54250WYK home theatre PC (HTPC).

Using Media Player Classic, Windows 8 Media Player (Windows 8 added native Dolby Support) and XBOX Media Center (XBMC) 5.1 works great.

I have not yet worked out how to play Dolby Digital 5.1 content using VLC player. The Windows sound control panel only shows two channels of audio with Dolby Digital bitstream support and you don't get the speaker configuration wizard which I have seen in the past on some sound cards.

Testing individual speakers was quite difficult using the movies I had available, however the following short VOB video goes through each speaker at a time making testing each channel easy.

http://www.wooferbasstest.com/download/test-tool-ac3-dolby-digital-5-1ch-sound-test

Dolby test video

Another way of testing to make sure that the playbar is receiving the bitstream source is by visiting the support infoweb pages on the playbar. To check this you can connect to the IP address of any Sonos device on the network at the following URL - http://:1400/support/review

Under the Playbar device there is a TOSLINK Status section which will show other Stereo or Dolby Digital 5.1 letting you know the format being played.

Sonos support page showing TOSLINK Status.
Something else I've observed is that if the Playbar is playing bistream audio, the volume controls in Windows no longer have any affect and you need to control the volume from your remote/Sonos desktop controller.

The new beta of XBMC Gotham also supports "upmixing" stereo to the rear spears as well which I'm looking forward to testing next weekend.

Thursday, November 21, 2013

Web Controller/API for Sonos System

There is node.js Sonos API and web controller interface being written by Jishi over at the Sonos forums. You can follow development and report bugs in this thread on the Sonos forums.

The webcontroller is still under development and has some issues with queues at the moment, but the primary features such as grouping, play/stop/etc and volume seem to work correctly. You can see from the screenshot below it appears a clone of the desktop controller and looks great!


Screenshot of the current state of the web based Sonos controller.
This was my first real foray into node.js and git platforms, something I had somehow managed to avoid until now. I wanted to run the web server on my old Drobo-FS so I first needed to install git and node.js from droboports.com.

To install I then changed directory to the DroboApps folder and ran the following commands:
  1. git clone https://github.com/jishi/node-sonos-web-controller (download the latest master build from the git repository)
  2. npm install (install all of the required dependancies) 
    Terminal showing installation commands
  3. cd node-sonos-web-controller
  4. node server.js (start the node.js web application)
    Service running. You can see it has automatically detected my zones.

You can update the project to the latest development master at any time by running "git pull" from the node-sonos-web-controller folder.
Issued that I encountered were: 
  1. The default apache installation I had installed on my Drobo-FS was running on port 8080. I just killed it as I wasn't using it anyway.
  2. I received "http not found" errors when trying to run "npm install" to get the required modules. Most likely this was a Drobo git/SSL build specific issue and I managed to bypass it with the following command: "git config --global http.sslVerify false"
It's a great project, I'm looking forward to seeing how far they go with it and if eventually new features are even added, such as requiring a PIN code, party mode etc.

Friday, January 11, 2013

Adding WIFI to the Arcade Cabinet in the Shed

I had been using my FRITZ!Box USB N stick in the shed connected to my arcade cabinet had a relatively weak connection to my router in the front of the house. Copying files to and from the machine was pretty slow 1-2MB/s and occasionally I would lose connection and would not be able to use the network when the shed door was closed.

To solve this I ordered from Amazon (via MyUS.com) a reasonably powerful Alfa 2000mW USB Wifi adapter ($39 USD) built into outdoor housing. To attached it to the shed I used the included screw rings to attach it to the gutter.

I then drilled a 10mm hole into the shed and fed through the mini-usb cable to the PC. The other end of the cable is 2 standard USB plugs (one of extra power) which are connected into the back of the computer.

Close up of  mounted Alfa Network WIFI endpoint

Antenna mounted to shed opposite cabinet
The connection in Windows now shows full bars and fluctuates between 130-150Mbit and copying some test files from my NAS transfer at a reasonable 6-9 MB/second. Problem solved :)

Tuesday, January 1, 2013

Building Arcade Hyperspin/Mame cabinet - Part 4

With the help of some friends I got the cabinet built from painted pieces in a solid day. It mostly comes together with IKEA type fasteners and you'd want at least another person to help build it.

I haven't gone into too much detail on the build process as Troy from ArcadeWorx provides very detailed build instructions with the kit.

Half built, adding speakers.
Completed product!
I'm very happy with the result and the colour looks great.

I was hoping to print the artwork at a professional printing shop on a nice material, however I was running out of time so I just measured the perspex panels and printed the artwork to size on multiple pages on my home laser jet. I then cut out the artwork and glued it to the back of the perspex with a UHU waterbased gluestick. My artwork source for the move lists was from Donovan Myers blog.

Street Fighter artwork for the control panel
I got a great hand from a friend with the console wiring. If I had been left to my own devices it would be a birds nest rather than the "milspec" result below.

Very neat wiring.
I'm using two Akishop PS360+ PCBs for the controllers which I purchased from In2Amusements. The autodetect their USB host on the other end when powered up and are compatible with PC, PS3 and XBOX 360.

At the moment I have the controllers configured as XBOX controllers for Windows, as this allows the joysticks to be compatible with Street Fighter 4 Arcade Edition (PC) which doesn't detect the joysticks when they appear to Windows as the "hat" pad. This has also lead to issues with Hyperspin as the Hyperspin 1.3x releases seem to have a compatibility problem issues with XBOX 360 controllers.

At the moment I am working around these issues by disabling the Joysticks in Hyperspin and using Xpadder software (~$10) to make the Joysticks send actions as keyboard key presses. For some reason Xpadder would hang as not responding when I first ran it so I set the executable as "Run as Administrator" and XP Compatability mode and it started working properly.


Every thing was setup for my New Years Eve party (~30 guests) and everyone had a great time reliving some of the classics from their youth. Later in the night I was even asked to attach my two USB joysticks for some 4 player games.
In use - 4 player with 2 USB Sticks connected.

I've still got a lot of work to do with Hyperspin and setting up all the emulators. Currently I'm still in a bit of semi-manual process with the keyboard required for certain features, so I think that the next couple of months will be spent on software configuration and possibly some rewiring of extra buttons and adding new features.

Friday, December 28, 2012

Building Arcade Hyperspin/Mame cabinet - Part 3

The final coat of blue added this morning. Sanded back the first coat of blue and then put on the last coat as evenly as possible. 

The console. Just add buttons and artwork!

Some of the front, sides and edges.

Although the paint isn't as glossy as I imaged it to be overall I am very happy with the result - it isn't perfect, but I've been told that gloss paint is one of the more difficult paints to get a flat finish on and I'm happy to have learned a new skill.

I have packed up the Dexter shed - there'll be no more painting this year. There might be a edge piece or two where the paint isn't complete that might be visible and if that is the case I might be a small very fine air gun to paint those parts after the cabinet has been built.

I will try seeing how far I can get with wiring up the console this evening and am hoping to enlist the assistance of a couple of friends in putting the cabinet tomorrow morning.

Hopefully the next post has completed pictures :)

Thursday, December 27, 2012

Building Arcade Hyperspin/Mame cabinet - Part 2

It's been a busy couple of painting days!

Firstly I went back to Super Cheap Auto and picked up a proper painting mask and better safety goggles. I didn't mind the white too much with the bad mask, but wasn't looking forward to the blue paint.

I then sanded the pieces back and put on the second layer of primer. I was smart enough to have stored a couple of pieces on top of each other before they were fully dry so I needed to pry them apart and then repair the MDF with some white TimberMate wood putty that I had spare from a previous project. I find it is best to just apply the putty with your hands rather than using a putty knife.

I also used the TimberMate again to seal some very small gaps in the console where some of the panels met. I was expecting the paint to fill the gaps, and it probably would have by the last coat, but better to be safe and sorry and it only takes a couple of minutes to do.


At the end of the day I had re-primed most of the pieces.


The next day I did some more minor repairs with the primer here and there and then sanded the paint back one more time. I then put on my first blue coat. The blue paint came much easier out of the spray gun which is making the job faster, but more challenging as it is easier to get a build up of paint.

First coat of the blue paint
I think the colour looks great. On a couple of the pieces I struggled getting even coverage (I had to turn  up the pressure a little bit on the air compressor to fix this) so I will sand these pieces back tomorrow morning and do them again for a final coat *fingers crossed*.

I'm glad I got the painting mask. Below is a picture of the mask after painting the first coat of blue.

The blue pad in the mask was originally white!
So my current plan is to finish up the blue painting tomorrow morning and wire up the console in the evenings over the next couple of days. Then on Sunday I hope I'll be able to put it all together and finish tweaking on Monday.

Sunday, December 23, 2012

Building Arcade Hyperspin/Mame cabinet - Part 1

About 5 years ago I had a project on the back of my mind to build an Arcade cabinet for home. At the time I looked into buying a build it yourself kit, however I could only find a company in Texas that did the parts and it would have been thousands to have it built and shipped to Australia. The other parts were also expensive so I let the dream slide.

Enter ArcadeWorx. Recommended to me by a guy in the office who has been looking at building his own cabinet. Troy at ArcadeWorx is a great guy to work with and cuts a variety of designs from MDF.

I found the Viewlix 32" Clone cabinet on their site and then emailed Troy with a couple of design changes I wanted - extra buttons and speaker layout. These weren't a problem however there were some restrictions on the TV to use so I started researching on-line and ordering parts.

The inside parts of the machine
Initial Parts list: 

TV - 32" LG 32LS4600. Fit the cabinet and supported 1080P which I was after not that easy to find in an afforable screen. Bought from Bing Lee online.
Speakers - 4" Polk DXi400 car speakers bought from Amazon. I love Polk stuff.
AMP - 2 Channel LP 2020A Lepai amplifer order from HK on eBay. Small unit I found recommended on AussieArcade forums.

It took a couple of weeks for the Viewlix clone to arrive. The shipment arrived in three flat pack boxes.

Sides and Back

Control Panel

Lots of pieces!
Initially I wanted to get the cabinet professionally painted. I visited an Auto Paint and Panel place across the road but they wouldn't have been able to start until the new year (for ~$700!) and my target is to have this done by New Years Eve.

I have never used a paint spray gun before so I watched a bunch of YouTube videos online and then obviously a qualified expert went to the Bunnings. 

It turns out that Bunnings doesn't sell Two Pack paint (used on cars). Being new to spray painting I was a bit nervous and was talked into trying the water based Dulux Aquanamel Gloss paint normally used for Trim and Window frames. This type of paint apparently "won't yellow" and should provide a good result.

I figured Water based would also be a safer option and would make it easier to clean up mistakes.

Primer and Aquanamel paint and paint mask

From the wall of colours, I chose Wing Commander Blue - seemed fitting. It will be interesting to see how it looks in gloss when it goes on.


While in Bunnings I also bought a Wagner W550 Fine Spray gun ($129), drop sheets, masking tape and simple paint masks. I then went home and prepared my "Dexter shed" for paining.

Dexter Shed
The Wagner W550 is an electric all-in-one unit which is very simple to setup and clean, however on a test piece I found it was spattering the paint too much, and using too much for an even coat. I tried making a few adjustments but I was not getting a good finish.

Wagner W550

The box showed people painting fences and kitchen cabinets. I'd recommend maybe for a picket fence or similar however I don't think I would have been happy with the result.

On the weekend my Dad came round to help with the Wagner and after giving it another go we decided to go buy a proper air spray gun kit. Off to SuperCheap Auto where we bought a SCA Gravity Feed Pro spray gun ($99) and a Black Ridge 2HP/21L air compressor ($119) and a hose. We were flying a bit blind here and the staff weren't very helpful, but everything seemed to come together.

Air Compressor

Serious Spray Gun

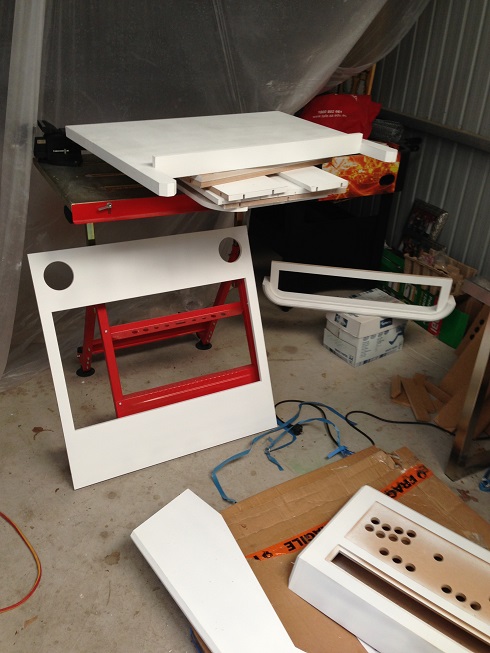
The difference between the Air Spray Gun and the Wagner was night and day. I was also using a LOT less paint with a much better result. I painted the primer on most of the outward facing pieces over a couple of hours and called it a day.

Drying parts inside the shed.
Storing dried parts outside.

The plan over the next couple of days is to sand back the primer and prime again - I will have to buy another tin of primer as the small tins are a bit small and the edges of the MDF where it was cut is very thirsty.

I will also have to go an buy a real paint mask. The simple masks aren't good enough - the hair in my nose was white!

Stay tuned for updates over the next couple of days.